A URL is how the online community views your site. A good URL can make or break a page sometimes. Normally when you create a new website in WordPress, the default permalinks are not optimal, which is why most developers change them.
Another thing that needs to be considered is how to change permalinks in WordPress without hurting your overall SEO structure.
Remember, once you publish a post or page, the URL (permalink) is then cached and indexed by Google and other search engines. Thus, if you choose to change the URL on a page or post in WordPress, it can disrupt that indexing.
Changing permalink structure after the fact can be devastating to your website SEO if this is not handled correctly. This is because it can lead to 404 errors.
Let’s dive into this issue and discuss it some. If you need to update your permalinks, then you have come to the right place.
What is a Permalink?
A permalink is a unique URL (web address) for any webpage on the internet.
Permalinks make it much easier to search, find, and link to specific web pages. This reason alone makes the permalink structure important.
The name actually comes from two words smashed together, “permanent” and “link.” Essentially, you are saying that when a page or post is published, the URL created becomes the “permanent link,” which is one that should never change.
If you really want to break it down even further, a permalink is just the fancy name for a URL that people use to access websites and web pages that they want to find and view. It’s the link people use to click on within text or through images and buttons.
Are Permalinks Important?
Absolutely!
Your permalinks are indeed very important for a number of reasons. First and foremost, they are important for the SEO of your website. Second, they are important for navigation, page identification, and sharing. All of these things are made easier for visitors on your website if you have a good permalink structure in place.
Think of a good permalink structure in this way:
It is like dialing a specific phone extension to get to a specific person when you’re calling a big company. Solid permalinks make this possible on a website.
A bad permalink structure or different permalinks everywhere coming from your site would be like being routed through the main phone number every time.
There are certain instances when you would use a permalink. Of course, when you are building a page or post, you want to make sure the permalink is custom and that it matches what you want.
However, you would also use permalinks in situations like:
- When linking to a specific post or page.
- Creating deep links for affiliate marketing purposes.
- Sharing on social media.
Also, consider how some permalinks have the date a blog post was published. As a result, some people may not visit your content if they deem it to be “too old.” Many online users like content fresh and current.
Why Change Permalinks in WordPress?
If you are about to tackle the process of changing permalinks in WordPress, then there is probably a good reason. More often than not, website owners change their permalinks because they do not like the original structure that was put into place.
Maybe you want to take out the date in your current URL or add tags like categories or other structural settings. You may be changing permalinks because your site is moving, or getting a new domain name. Even changing your protocol from HTTP to HTTPS required you to deal with 301 redirects and permalinks.
Other reasons for doing this include things like:
- Your old post and page structures are not user-friendly.
- Maybe your existing permalink structure has no SEO advantages.
- You are trying to rebrand your website.
Whatever the reason may be, let’s take a look at how to successfully perform a WordPress change of URL and keep your SEO intact.
How to Properly Change Permalinks for Published Content in WordPress
Now that you have a good idea of what permalinks are and how important they can be to your website and SEO, let’s take a look at how to edit a permalink in WordPress without destroying your current links and SEO structure.
So, there are actually a couple of ways to do this. You will need quite a bit of database and cPanel knowledge to perform this all manually. Luckily, that’s not required. Everything can be completed by using the right combination of plugins.
There are three main steps you need to perform in order to change permalinks in WordPress successfully without hurting your SEO.
- Backup your website (just in case)
- Create Permanent 301 Redirects
- Change Your Permalink Structure
Let’s go over these together. I will talk about each step a little and link you to the relevant tutorials that will take you through each process. There are also a couple of other plugin suggestions for you if you are interested.
Step 1: Backup Your Website
Backing up your website is something you should do whenever you are making any sort of big changes. Even though your web host probably makes backups, it is still a good idea to backup your WordPress website yourself. You can do this manually or use a plugin, the choice is yours.
You won’t actually be using the backup for anything in the process, but you will have the files and database in place and ready if something goes terribly wrong while changing your permalinks.
If so, you simply add backup website files and the database into place and you can start from the beginning.
Step 2: Setup Permanent 301 Redirects
Our second step is to set up the Redirection plugin. This allows you to automatically set up 301 redirects to correct 404 error pages when changing the permalink structure.
Ultimately, this step will allow you to change the permalinks structure without breaking links. Thus, it’s the most important step.
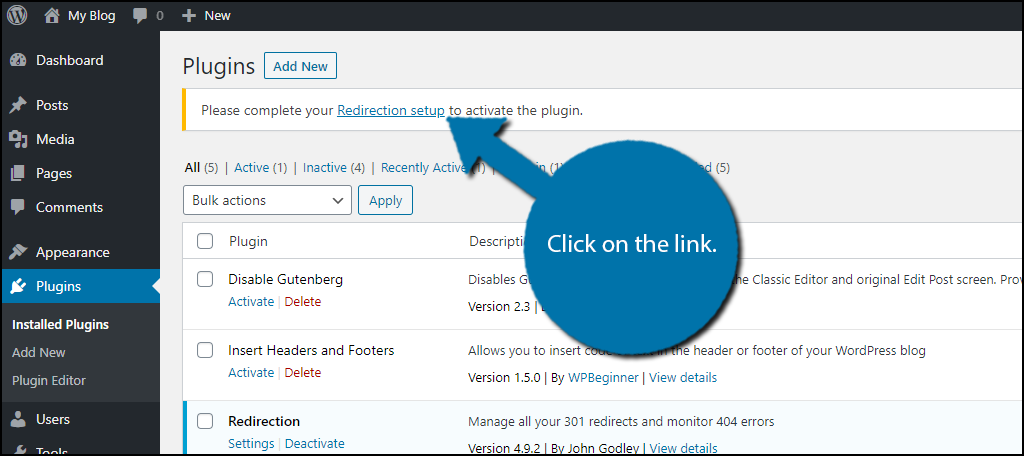
Install the Redirection plugin and activate it for use. Upon activation, you should see a message at the top asking you to complete the Redirection setup. Click on the link.
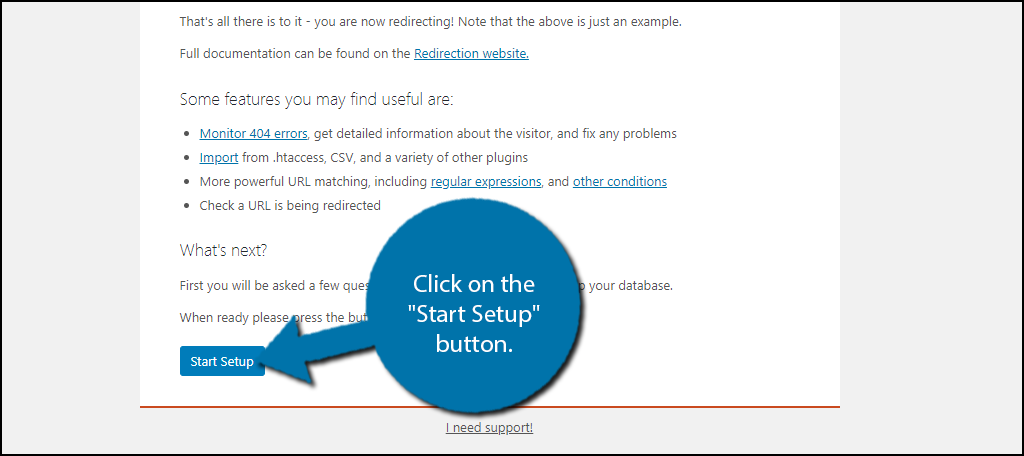
This will give you a quick overview of how the plugin works and what it can do. Click on the “Start Setup” button when you have read the page.
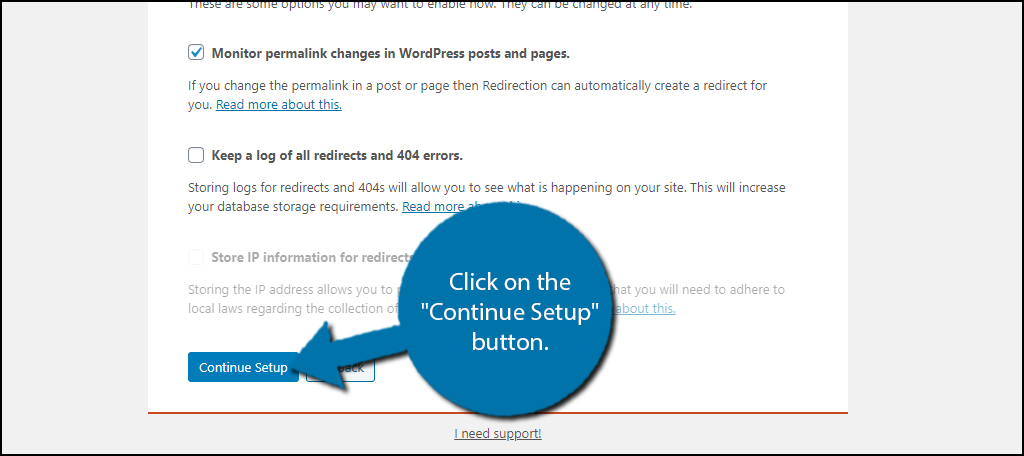
The basic setup section is the most important because of the first option. It allows the plugin to monitor permalink changes to your website and it will automatically set up the redirects. Thus your website’s links will work without having to make any manual changes.
Check the first checkbox.

Select any of the other options you feel are helpful and click on the “Continue Setup” button.
The plugin will now test the connection to the REST API. This is how the plugin communicates with WordPress. You can see the results of the test next to the REST API option.
As long as it says working, you are good to go.
Note: You may also see “Working but some issues” and that is okay. You can check the summary to try and resolve the problems. Check the plugin’s FAQ to find a solution to the issue.
Click on the “Finish Setup” button.
The plugin should automatically set up 301 redirects when we change the permalinks in the next step.
Step 3: Change Your Permalinks
With the Redirection plugin in place, you are ready to change your permalink structure.
WordPress offers a number of different custom permalink options within the WordPress admin dashboard. Thus, you won’t need a plugin for this step. However, it is worth mentioning that there are a variety of plugins available that can do the job as well.
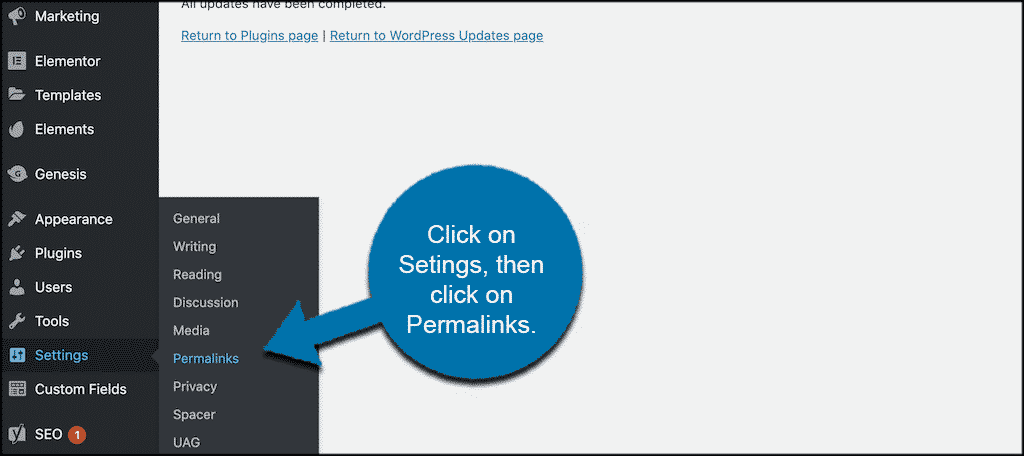
To access the built-in method, click on Settings and select the Permalinks option located on the left-hand admin panel.
This will take you to the custom permalink setup that WordPress offers. From here, you can adjust and set your website permalinks to exactly what you want them to show.
Unfortunately, WordPress does not pick an SEO-friendly permalink structure by default. And if you didn’t catch it early enough, it could be a major factor in why your website is not ranking well.
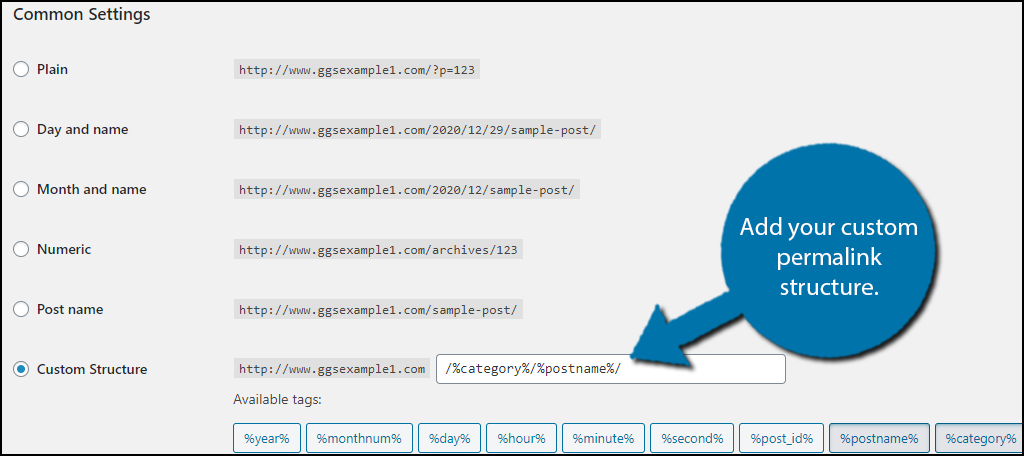
There are multiple structures to choose from and you even have the option to create your own custom permalink structure. But, if you’re looking for the best, which I know you are, Yoast SEO recommends using a custom structure of “/%category%/%postname%/” but the choice is up to you.
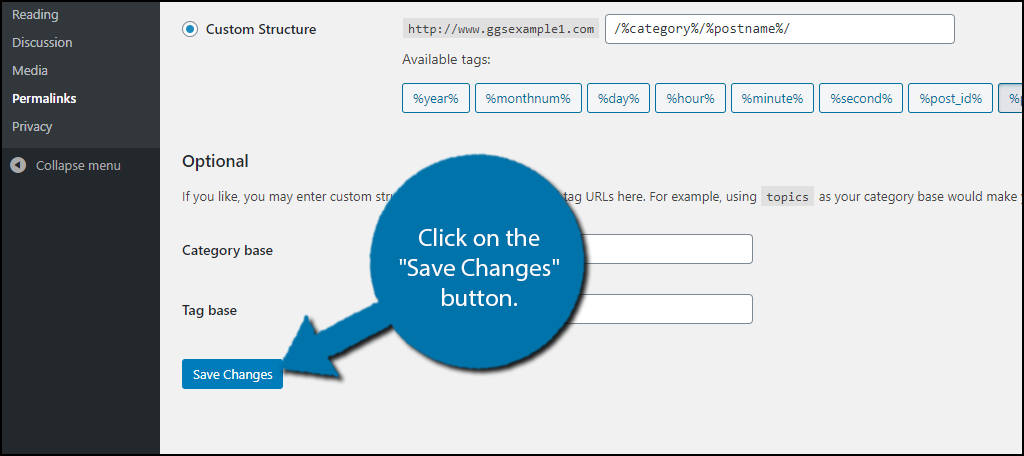
Once you have changed the permalink structure, click on the “Save Changes” button. This will force WordPress to update the permalinks structure of your website.
The redirection plugin should now create redirects for all of your pages. If you are still experiencing problems, check out the troubleshooting section below.
Congratulations on changing your permalink structure, without damaging your website’s SEO.
Warning: Changing your permalinks settings can seriously impact your search engine visibility. It should almost never be done on a live website. If it is, consider submitting a new sitemap to Google ASAP.
Troubleshooting
If the Redirection plugin has not automatically set up redirections, then you are going to need to make an adjustment.
This means you need to set up a manual redirection. Unfortunately, the exact text of redirection depends on what permalink structure you are coming from and what permalink structure you are going to.
Thus, the exact code will be different for everyone.
Luckily, Redirection has an excellent guide for how to create redirections based on patterns, which is exactly what a permalink structure change is.
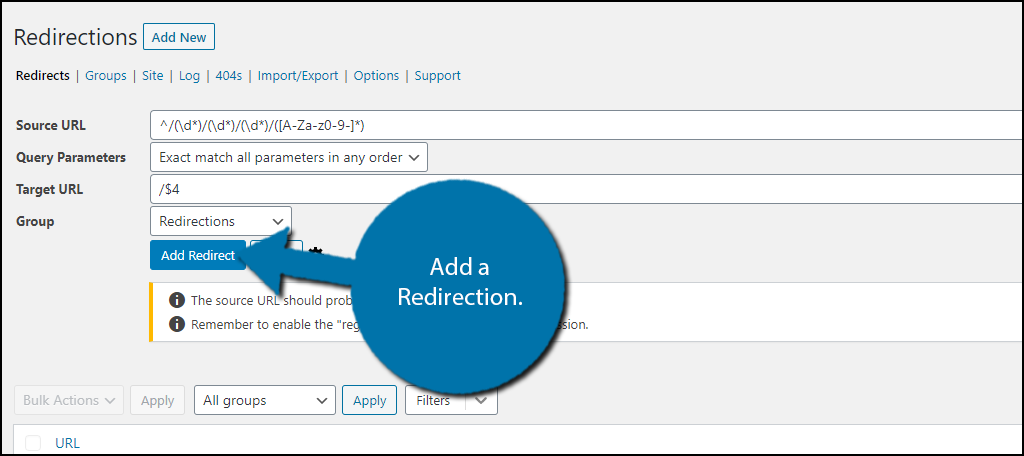
For instance, if you were changing from date/post-title permalink structure to a /post-name structure, the Source URL would be “^/(\d*)/(\d*)/(\d*)/([A-Za-z0-9-]*)” and the Target URL would be “/$4“:
Note: Even if you were making this exact change, the above redirection might not work correctly based on the type of date you had before. After all, there are numerous ways to display the date in URLs.
However, odds are you will need a different redirection.
Thus you are going to need to use the Redirection plugin expressions guide to figure out how to do this for your specific case.
Final Thoughts
As long as you follow the steps above as they are given, you should be able to successfully change permalinks in WordPress and keep all of your SEO structure and rankings intact.
This isn’t something you should do often, so make sure you are satisfied with your new permalink structure.
Did this process work for you? What other tools or plugins did you use? Do you prefer to complete the entire process manually?
I followed the steps exactly as you wrote them, including checking the box to monitor permalinks and it didn’t work. I had to go through and fix every link manually. Disappointing 🙁
I’m sorry to hear that it didn’t work for you. I’ve used Redirection on several of my own blogs without difficulty. You might have to contact the developer directly to figure out if something you have installed prevented the move.